Many of us photographers are a one-person show. We power the unicycle and spin all of the plates and consider ourselves lucky if we’re able to find time at the end of the week to bunker down with a movie and a glass of wine.
Time is precious. Spare moments should be spent relaxing or plotting your next creative session, not playing an eternal game of catch-up. If you have the kind of brain that’s great when it comes to framing, lighting, and being a fabulous creative but not the kind of brain that’s great when it comes to systems, organization, and management, you’re not alone! If your inbox is overflowing with neglected emails and your hard drives are carrying raw files yet to be imported, we hear ya. Don’t worry, there’s nothing wrong with you. It’s likely that you have a workflow issue. And literally nobody in this world can run a successful and growing business without putting workflow systems in place. Workflows save you bucketloads of time and prime your biz for the kind of growth that supports your lifestyle.
Work less, live more? Yes, please. Here’s how.

1. Define your success.
One of the most amazing things about being a human on this planet is the fact that we get to live on it with other humans that are soooo different to us. There is no one-size-fits-all approach to photography or life or the definition of success, especially in the creative/freelance industry. Maybe your idea of success is working two days a week and spending the rest of your time with your kids. Maybe your idea of success is having a booked out schedule of elopement shoots that take you all over the world.
But either way – in order to move forward, you’ve gotta know where you’re going.
Laying down a strong foundation for your growth means a plan for your photography business, and getting into the nitty gritty of numbers so you are able to better determine the financial demands of your life and the business. Ask yourself:
- How many shoots per week do you have time to take on?
- How many shoots per week do you need to take on in order to live comfortably?
Doing this kind of groundwork also helps you stop comparing yourself to other photographers out there, giving you more mental space to focus on your own creativity.
2. Define your workflow.
So at this point you’re probably aware that a workflow is a good thing that saves you time and boosts your photography business, giving you more time to take on new clients. But what is it, exactly?
Workflows are all in the details. They help you power the processes that keep everything running. They’re the unsuspecting hero, the underdog, the behind-the-scenes warrior. If you’ve ever hopped into the Unscripted App and used our Photoshoot checklist, you’ve availed of a workflow step.
An example of a workflow around a shoot would be:
- Clients inquire through your contact form.
- You receive it, send a welcome email, and arrange an intro call.
- Clients get back to you with some dates.
- You reply with booking details, a questionnaire, and lock in a date.
- Before the shoot, you scout a location, research permits and rules, make sure they’ve completed their questionnaire, signed the contract, and paid the deposit.
- A couple weeks out, you follow-up with an email with a style guide if necessary, and some information for your client as to what they can expect on the day of the shoot.
- One week before the shoot, you check weather, wind, tides, etc.
- Check the location for any changes.
- Confirm time and location with client, curate poses and prompts, and check for final payment.
- On the day of the shoot, you send the client a reminder text, maps your driving route, review saved poses and prompts, reset camera settings, clean lenses, pack extra batteries and cards, format SD cards, fuel up your car, grab your water bottle, and off you go.

This isn’t by any means everything you have to remember, sometimes--as we’re sure you know--it requires lots more. This is where it starts to get tricky when you get busy. The later you stay up editing the night before, the harder it is to remember to pack that extra battery or SD card. It’s for this exact reason that we’ve rolled out some amazing features in the app to make your life easier.
You don’t even have to rack your brains to remember all of the things you tend to forget. We’ve gone to the trouble of laying it all out for you in the “My Photoshoots” section of the app. You’ll find a checklist, a timeline, and a whole bunch of pre-saved messages to save you precious time and make sure you never forget a spare battery again!

3. Take stock.
Get as many things out of your brain and onto the page as you can. If you’re anything like us, there are so many things floating around in our heads at any given moment, it’s a wonder we still have time to shower--much less run successful businesses. Get some paper, some pencils, and a mug of coffee on the table and write down all of the services or processes you can think of in your business. For example - from inquiry to invoice, what is the process that you go through with each client for, say, an engagement shoot. Is there anything you can automate or streamline? Are there any emails that you send often that you could turn into a template for quick and easy communication?
Unscripted has contracts, invoices, and questionnaires that you can shoot off super easily right through the app. Pre-saved messages will save you a ridiculous amount of time, and you’ll be as happy to have found them as you are sad to realise how much time you’ve wasted before having them. Send emails directly from the Unscripted App, and customise each one for each individual client. No more having to rack your brains for a response every single time you get a new inquiry, no more blank stares at the cursor on your screen.
For the remaining items that you know you absolutely need to do manually every time, mark these as a priority. It helps to make yourself a template (like the checklist above) to track where you’re up to and make sure nothing’s slipped through the cracks.
If you’re reading this and feeling like we’re just heaping more work onto your plate instead of alleviating your stress, we totally get it. These first couple of times might be a little time-consuming at first, but once you get your systems in place, it’ll be so easy to repeat the process over and over again. Believe us, the time you save in the long term will make it all worth it.

4. Create an organisational ecosystem
If there’s anything we wish we could travel back in time and tell our past selves, it’s simplify. Simplify, simplify, simplify. You know you have a good organisational ecosystem when all of the platforms you use work well in tandem with one another. Make sure that each platform that you use has its own specific function. If you want inquiries to come in via email, make sure the Facebook page you’ve set up to get the word out about your photography directs all messages to your email. If you use Lightroom to convert your raws, make sure you have a good preceding file organisation workflow.
Let’s dig into this a little more. If any of you have versions of edits with file names that look like this: “IMG9087edit.jpg” or “IMG9079finaledit.jpg” or even “IMG9079finalFINALedit.jpg,” you’re probably aware on some level that there’s room for improvement.
This is our workflow for the process from backup to delivery:
1.) Back it up (in at least three places)!
- Backup your raw files to a hard drive -- and make sure not to clear the CF or SD card until the files are delivered. We usually enjoy throwing caution to the wind but in this instance you’re better off safe than sorry. Trust us.
- Have a cloud-based backup service in place, like Google Drive or Dropbox.
2.) Organise your files.
- In your hard drive, create a new master folder for each photoshoot with the shoot title and date. Make sure that the format is the same throughout, so you can organise the folders chronologically. For example: YYMMDD_ShootName.
- Within the master folder, create three folders.
﹍ ﹍ 1. Raw (All raws)
﹍ ﹍ 2. Selects (a selection of images chosen to edit)
﹍ ﹍ 3. Edits (all edited photos exported from lightroom)
Some notes on culling -- we use Photo Mechanic (https://home.camerabits.com) to load RAWS in seconds and tag our favourites to pull into Lightroom. It saves so much loading time and keeps your Lightroom folders looking nice and clean. Once you’ve got everything loaded into Lightroom, export your favourites from Photo Mechanic to the selects folder on your harddrive to keep it all consistent.
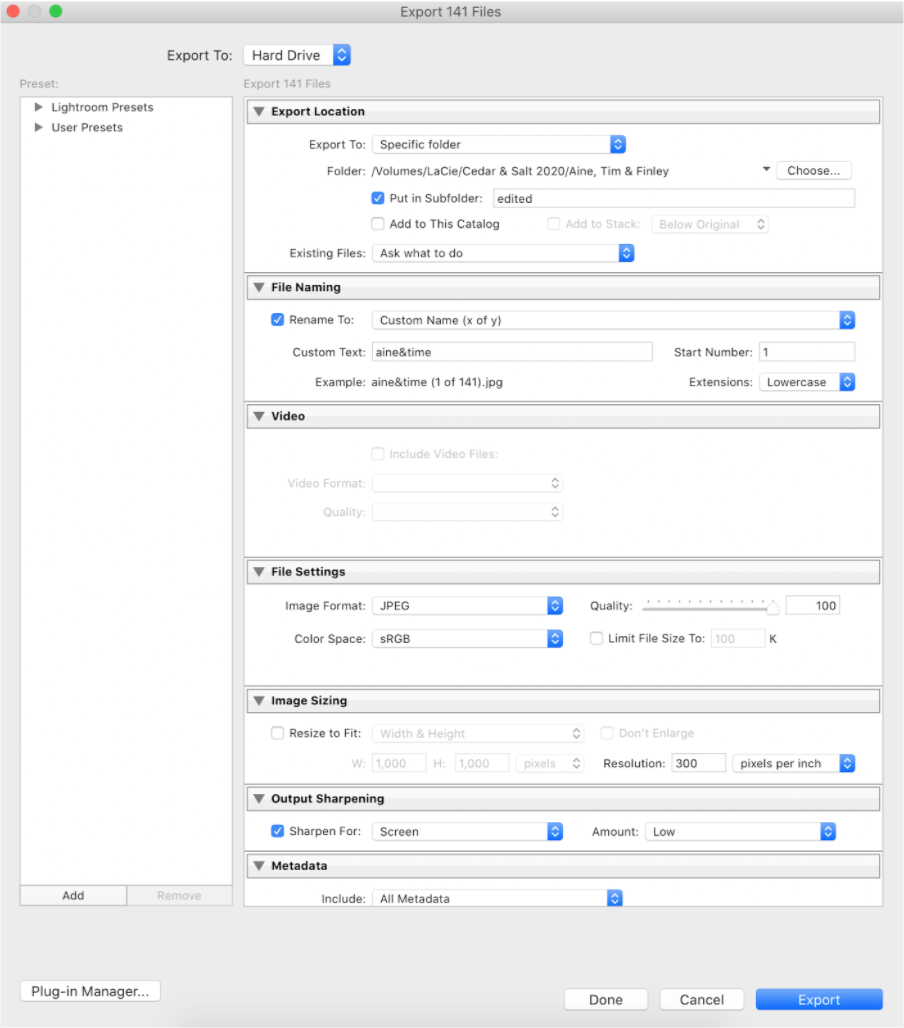
A bit more on exporting -- instead of having all your files be IA23987.jpg or IMG_8234.jpg, hit two birds with one stone and batch-rename your images to be easily searchable when your client re-uploads your amazing photos to their socials or website. Rename the photographs with SEO compatibility in mind. For example: Nashville wedding - Sarah and Dave.jpg. Save all of this to the edited folder on your harddrive.
When publishing & delivering, use pixieset, pictime, or shoot proof to curate a sleek and sophisticated gallery to present your beautiful work to your clients. Pixellu offers a smart slideshow maker for photographers to present your images with maximum emotional impact.
Notes for all of our Lightroom users out there:
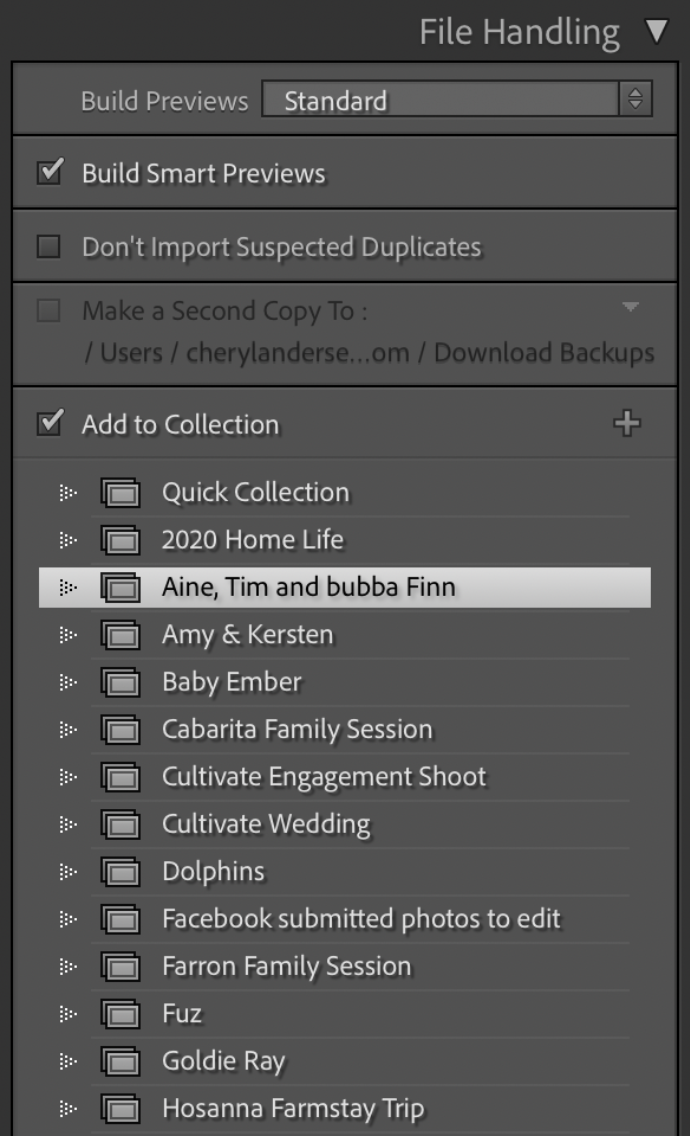
- When you click import, only upload the selects. Create smart previews so you can edit images that are not physically connected to your computer. If your computer is a little slow at the best of times, this is a great way to free up disk space while you work, working on smaller, more manageable files and syncing the files to your hard drive with their bigger versions at the end of your editing session.
- Lightroom’s super powerful organisational tool, collections, helps to group photos together in a way that speeds up your workflow. Collections give you more freedom than the Folders panel by allowing you to add one photo to multiple collections, allowing you to store it in multiple places and organise your images according to relevance. You could organise this to mirror what’s happening on your harddrive with RAWS, Selects, and Edits.
- Want a quick run-down of how best to export your photos for postcards or socials? Check out our bonus pocket guide, below.
With all of the new platforms and social media sites out there, we’re swamped with different ways to communicate, organise, and work. The more streamlined of a system you have to get on top of it all, the easier your life will be.

5. Revisit your dreams.
Remember how at the beginning of all of this you had a long, hard think about what success looks like for you? Well, now that you’ve got some of these systems and workflows in place, it’s time to explore many ways that you can begin to enjoy your newfound freedom! What are some things you’ve been meaning to get around to but have never had the chance to begin? You’ll be amazed at how your creativity begins to thrive now that you’re not bogged down by a ridiculous back-log of edits and emails. You actually get to channel your energy into the good stuff – creative sessions, time with people that give you all the belly laughs, and nurturing a business at your own pace.
Let us know how you’re going on this weird and beautiful journey we call life. Are there things that you have time for now that you never thought you’d be able to squeeze in? Do you still find yourself a bit stuck in certain ways? We’re here for you. Shoot us a message anytime on our Facebook Group, or tap into a strong community of fellow creatives. Happy livin’!
Let's recap:
- Figure out what success means to you.
- Write down all of the tasks you do.
- Decide what to automate.
- Get systems in place.
- Start livin’!
Get Unscripted’s entire Education Section on the go so you can skill up no matter where you are! Download now for free.
Bonus pocket guide: Lightroom export settings
Exporting photos for socials and web
File settings
▢ Image format - JPEG
▢ Quality - 100
▢ Color Space - sRGB
▢ “Limit File Size To” box UNTICKED
Image sizing
▢ “Resize to Fit” box ticked
▢ Set drop-down next to “Resize to Fit” to “Long Edge”
▢ In box below “Long Edge,” set to 2048 pixels
▢ Resolution - 72 pixels per inch
Output sharpening
▢ Leave unchecked or check the box and choose “screen” and “low” form drop-downs. Be aware that too much sharpening is really obvious on web-res images.
Exporting photos from lightroom for delivery and print
File settings
▢ Image format - JPEG (or TIFF for really big files sent to a printer)
▢ Quality - 100
▢ Color space - sRGB
▢ “Limit File Size To” box UNTICKED
Image sizing
▢ “Resize to Fit” box unticked
▢ Resolution - 300 pixels per inch
▢ Output Sharpening - Sharpen for Matte, Standard Amount

lead your photography
sessions with confidence.


FAQ's
What is a photography workflow, and why is it important for photographers?
What are the key stages in a photographer's workflow, and how can I optimize each stage?
How can I maintain consistency in my editing style and overall photography workflow?
What tools and software can help me improve my photography workflow?
